The outside bar is a powerful price action pattern that often signals a potential reversal. Unlike single-wick setups such as a pinbar strategy, the outside bar forms when a candle’s high and low both exceed those of the prior candle, effectively “engulfing” it completely.This wide-ranging bar represents a change in buying or selling pressure and illustrates the decisive battle, with one side clearly emerging stronger by the close. For traders looking at reversal setups, this pattern may provide a clear structural clue that market sentiment has shifted significantly.
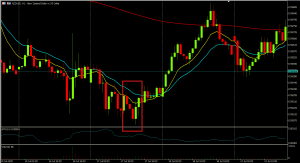
Bearish Outside Bar
A bearish outside bar occurs at the end of a bullish upswing in price and sellers move in to overwhelm any buyer volume that is left in the market. The outside bar pushes above the prior candle’s high but then collapses through its low, closing below the low of the previous candle.This sudden failure at higher prices can often signal price move exhaustion of the uptrend and may be the start of a bearish reversal.
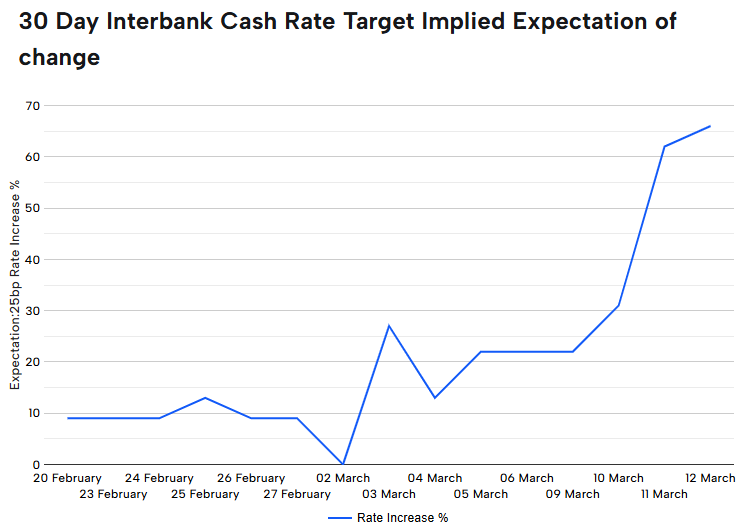
A: Prior advance (bull candles) → strong upward movement into resistance.
B: Outside bar (bearish close) → candle exceeds both high and low of previous candle, closing down.
C: Confirmation candle (bearish close) → follow-through selling that validates the reversal.
The NZDUSD 1-hourly chart below shows two examples of this setup in action:
Bullish Outside Bar
A bullish outside bar appears after a decline when buyers step in aggressively. The candle drives below the prior low but then rallies strongly, closing higher and engulfing the prior candle.This shift signals that selling pressure has been absorbed, and buyers are likely taking control.
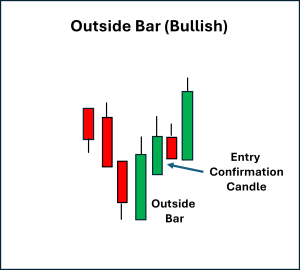
A: Prior decline (bear candles) → downside momentum into support.
B: Outside bar (bullish close) → candle exceeds both high and low of previous candle, closing up.
C: Confirmation candle (bullish close) → follow-through buying that confirms the reversal.
The AUDJPY daily chart below shows two examples of this setup in action:
Stop Placement and Exits
A logical stop placement that indicates your trading idea may not have gone as you had hoped it might, and may be a placement beyond the extreme of the outside bar. Therefore:
In bearish setups, a stop is placed above the high of the outside bar.
In bullish setups, a stop is placed below the low of the outside bar.
Common additional exit approaches may include:
Targeting the next key support/resistance zone,
Using a fixed risk-to-reward ratio (e.g., 2:1 or 3:1),
Or trailing stops behind subsequent highs/lows as the price moves in your desired direction to capture extended moves whilst locking in profit,
Final Thoughts
The outside bar is a clear visual signal that suggests a change in the balance of buyers versus sellers, where one side overwhelms the other. It may often offer a high probability of follow-through when it appears at significant levels of support or resistance.Like all setups, outside bars are fallible. For example, choppy markets can generate multiple false signals, so combining the pattern with context trend alignment, confirmation candles, and other confluence factors such as increased volume may help improve signal reliability.As always, it is worth reinforcing that an entry set alone will rarely be successful unless you have robust and unambiguous rules around the primary price action of an outside bar.Testing what these factors are and which confluence factors may work for you across different markets and timeframes is critical in creating a complete trading strategy. Only then should traders add the outside bar to their price action toolbox.
By
Mike Smith
Mike Smith (MSc, PGdipEd)
Client Education and Training
The information provided is of general nature only and does not take into account your personal objectives, financial situations or needs. Before acting on any information provided, you should consider whether the information is suitable for you and your personal circumstances and if necessary, seek appropriate professional advice. All opinions, conclusions, forecasts or recommendations are reasonably held at the time of compilation but are subject to change without notice. Past performance is not an indication of future performance. Go Markets Pty Ltd, ABN 85 081 864 039, AFSL 254963 is a CFD issuer, and trading carries significant risks and is not suitable for everyone. You do not own or have any interest in the rights to the underlying assets. You should consider the appropriateness by reviewing our TMD, FSG, PDS and other CFD legal documents to ensure you understand the risks before you invest in CFDs. These documents are available here.
免责声明:文章来自 GO Markets 分析师和参与者,基于他们的独立分析或个人经验。表达的观点、意见或交易风格仅代表作者个人,不代表 GO Markets 立场。建议,(如有),具有“普遍”性,并非基于您的个人目标、财务状况或需求。在根据建议采取行动之前,请考虑该建议(如有)对您的目标、财务状况和需求的适用程度。如果建议与购买特定金融产品有关,您应该在做出任何决定之前了解并考虑该产品的产品披露声明 (PDS) 和金融服务指南 (FSG)。
For over 110 years, the Federal Reserve (the Fed) has operated at a deliberate distance from the White House and Congress.
It is the only federal agency that doesn’t report to any single branch of government in the way most agencies do, and can implement policy without waiting for political approval.
These policies include interest rate decisions, adjusting the money supply, emergency lending to banks, capital reserve requirements for banks, and determining which financial institutions require heightened oversight.
The Fed can act independently on all these critical economic decisions and more.
But why does the US government enable this? And why is it that nearly every major economy has adopted a similar model for their central bank?
The foundation of Fed independence: the panic of 1907
The Fed was established in 1913 following the Panic of 1907, a major financial crisis. It saw major banks collapse, the stock market drop nearly 50%, and credit markets freeze across the country.
At the time, the US had no central authority to inject liquidity into the banking system during emergencies or to prevent cascading bank failures from toppling the entire economy.
J.P. Morgan personally orchestrated a bailout using his own fortune, highlighting just how fragile the US financial system had become.
The debate that followed revealed that while the US clearly needed a central bank, politicians were objectively seen as poorly positioned to run it.
Previous attempts at central banking had failed partly due to political interference. Presidents and Congress had used monetary policy to serve short-term political goals rather than long-term economic stability.
So it was decided that a stand-alone body responsible for making all major economic decisions would be created. Essentially, the Fed was created because politicians, who face elections and public pressure, couldn’t be relied upon to make unpopular decisions when needed for the long-term economy.
Although the Fed is designed to be an autonomous body, separate from political influence, it still has accountability to the US government (and thereby US voters).
The President is responsible for appointing the Fed Chair and the seven Governors of the Federal Reserve Board, subject to confirmation by the Senate.
Each Governor serves a 14-year term, and the Chair serves a four-year term. The Governors' terms are staggered to prevent any single administration from being able to change the entire board overnight.
Beyond this “main” board, there are twelve regional Federal Reserve Banks that operate across the country. Their presidents are appointed by private-sector boards and approved by the Fed's seven Governors. Five of these presidents vote on interest rates at any given time, alongside the seven Governors.
This creates a decentralised structure where no single person or political party can dictate monetary policy. Changing the Fed's direction requires consensus across multiple appointees from different administrations.
The case for Fed independence: Nixon, Burns, and the inflation hangover
The strongest argument for keeping the Fed independent comes from Nixon’s time as president in the 1970s.
Nixon pressured Fed Chair Arthur Burns to keep interest rates low in the lead-up to the 1972 election. Burns complied, and Nixon won in a landslide. Over the next decade, unemployment and inflation both rose simultaneously (commonly referred to now as “stagflation”).
By the late 1970s, inflation exceeded 13 per cent, Nixon was out of office, and it was time to appoint a new Fed chair.
That new Fed chair was Paul Volcker. And despite public and political pressure to bring down interest rates and reduce unemployment, he pushed the rate up to more than 19 per cent to try to break inflation.
The decision triggered a brutal recession, with unemployment hitting nearly 11 per cent.
But by the mid-1980s, inflation had dropped back into the low single digits.
Pre-Volcker era inflation vs Volcker era inflation | FRED
Volcker stood firm where non-independent politicians would have backflipped in the face of plummeting poll numbers.
The “Volcker era” is now taught as a masterclass in why central banks need independence. The painful medicine worked because the Fed could withstand political backlash that would have broken a less autonomous institution.
Are other central banks independent?
Nearly every major developed economy has an independent central bank. The European Central Bank, Bank of Japan, Bank of England, Bank of Canada, and Reserve Bank of Australia all operate with similar autonomy from their governments as the Fed.
However, there are examples of developed nations that have moved away from independent central banks.
In Turkey, the president forced its central bank to maintain low rates even as inflation soared past 85 per cent. The decision served short-term political goals while devastating the purchasing power of everyday people.
Argentina's recurring economic crises have been exacerbated by monetary policy subordinated to political needs. Venezuela's hyperinflation accelerated after the government asserted greater control over its central bank.
The pattern tends to show that the more control the government has over monetary policy, the more the economy leans toward instability and higher inflation.
Independent central banks may not be perfect, but they have historically outperformed the alternative.
Turkey’s interest rates dropped in 2022 despite inflation skyrocketing
Why do markets care about Fed independence?
Markets generally prefer predictability, and independent central banks make more predictable decisions.
Fed officials often outline how they plan to adjust policy and what their preferred data points are.
Currently, the Consumer Price Index (CPI), Personal Consumption Expenditures (PCE) index, Bureau of Labor Statistics (BLS) monthly jobs reports, and quarterly GDP releases form expectations about the future path of interest rates.
This transparency and predictability help businesses map out investments, banks to set lending rates, and everyday people to plan major financial decisions.
When political influence infiltrates these decisions, it introduces uncertainty. Instead of following predictable patterns based on publicly released data, interest rates can shift based on electoral considerations or political preference, which makes long-term planning more difficult.
The markets react to this uncertainty through stock price volatility, potential bond yield rises, and fluctuating currency values.
The enduring logic
The independence of the Federal Reserve is about recognising that stable money and sustainable growth require institutions capable of making unpopular decisions when economic fundamentals demand them.
Elections will always create pressure for easier monetary conditions. Inflation will always tempt policymakers to delay painful adjustments. And the political calendar will never align perfectly with economic cycles.
Fed independence exists to navigate these eternal tensions, not perfectly, but better than political control has managed throughout history.
That's why this principle, forged in financial panics and refined through successive crises, remains central to how modern economies function. And it's why debates about central bank independence, whenever they arise, touch something fundamental about how democracies can maintain long-term prosperity.